How to configure DFS namespace in Windows Server 2012 R2
In this article, we’ll learn the steps to configure DFS namespace in Windows Server 2012 R2. In old post, we already learned the steps to install DFS. A DFS namespace is used for centralized management of all share folders in a domain. A single namespace consists of various share folders from different servers. For the end users, each namespace appears like a shared folder consists various nested folders and files.
Let’s understand more about the DFS Namespace
Let’s assume that you want to purchase Milk, Eggs, Bread and Butter and they all are available in different stores i.e. you need to go to all these individual stores. If a new stores open in your locality that offers all the above mentioned items at the same place then which store would you prefer?
Multiple stores that offers individual items or a single store that offers all the items. A single store that offers all the items.. correct???
Similarly, in your Organization, if multiple share folders are disbursed on multiple servers and you access them on regular basis, are you not facing difficulty in remembering them.
Alternatively, what if single UNC path is provided to access all the share folders, isn’t that would be more appropriate and easy to remember.
DFS Namespace acts like a one stop shop from where you can access all the share folders, irrespective of their locations. By just adding the pointer in DFS, we can access all the disbursed share folder at one single point. It is also good from security point of view, if you don’t want to give the information of Share folders to end users then you can give them single UNC path instead of giving them information about all the Computers hosting folders.
Steps to configure DFS Namespace in Windows Server 2012 R2
1. Click on start button, then click on down arrow and select DFS Management console to open DFS management console.
2. In “DFS management console” right click on Namespace to create a new namespace.

3. In ‘Namespace server console’ click on browse to write the name of the server which host the namespace. In this practical, we’ll install and configure DFS on Server DC03.
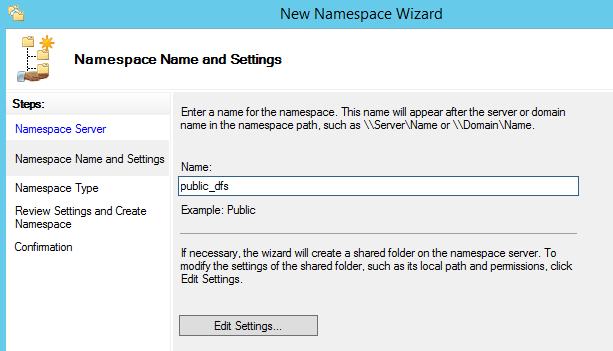
4. In “Namespace Name and Setting” console assign the name, we’ll define “Public_DFS”. Click on “Edit Settings” and browse the local path of the folder to share in namespace. Even you can change the permission of the share folder according to your requirements. For this practical, we’ll give read permission to all the users. Click on ok.
5. In the “Namespace Type” console it provide us the details for both Domain based namespace and Stand-alone namespace. Domain-based namespace is stored in Active Directory and provides more scalability as it can be load balanced with other Domain Servers. However, “Stand-alone namespace” is stored on single namespace server.
6. Here, we can review the all selected settings for New Namespace. If we want to change any selected setting then click on previous button. Namespace name that users will browse to access all the DFS managed share folder is \\itingredients.com\public_DFS. Click on create to create the DFS namespace.
7. In the Confirmation console we get the confirmation that the new Namespace has been created successfully. Click on close to close the wizard.
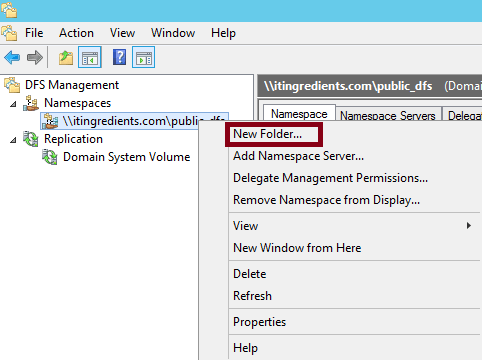
8. Once the namespace is created, next step is to add the link of Share Folders hosted on other servers. To add the folder, right click on the UNC link and click on “New Folder”.
9. Define the name of the folder and click on “Add” to add the UNC path. For this example, we’ll add the path “\\DC03\dc03_dfs“.
10. Link of the Share folder would be added to the “DFS Namespace“. Similarly you can link DFS share hosted on other computers.
11. To verify your Namespace through Domain Name, Click on start, open Run and type the name of the domain i.e. \\itingredients.com or type the full UNC path i.e. “\\itingredients.com\public_dfs” and hit enter.
12. It would show you all the Share folders, even we can see the namespace that we created i.e. “Public_DFS”. Double click to open it.
13. This would show link to all the Share folder that we added to Namespace. By using this UNC path users can access all the disbursed share folders. And they don’t have to go to individual Computers to access the share folders.


