How to Create Secured https website using SSL Certificate
How to create secured HTTPS website using SSL Certificate
Securing data is very important for any Organization. In this article, we’ll learn the steps to create secured https website using SSL Certificate. Hyper Text Transfer Protocol Secure (HTTPS) website is used to host a secure website which is encrypted. Encryption converts the data into encrypted format, it secures the data while it’s transferring over the WAN. The default port of HTTPS site is 443. Any website that wants to secure the communication use HTTPS for secure transactions. SSL Certificate can be used to secure both internal and external communication. External certificates can be purchased from Organizations like GeoTrust.
Steps to Create Secured https website using SSL Certificate in Windows Server 2012 R2.
Let’s take a scenario, we have two servers, DC04 is our Domain Controller and DC01 is our WebServer. We have already installed Internet Information Services on DC01 and installed Certificate Authority on DC04. Process begins with the steps of requesting certificate from the Certificate Authority, in this example, we’ll request Certificate from the internal Certificate Authority.
1. To request the certificate go to Server DC01 (WebServer), open IIS manager, click on Computer name “DC01” then click on Server Certificates icon.

2. In Server Certificates, On the right side click on Create Certificate Request to raise a new request for a certificate.
3. To create secured https website using SSL certificate, in ‘Distinguished Name Properties’ Console, here we have to specify the required information for the certificate like Common name, Organization, City, State and Country.
4. In ‘Cryptographic Service Provider Properties’ select “Microsoft RSA SChannel Cryptographic Provider” and select ‘2048’ bit length. The bit length of the encryption key determines the certificate’s encryption length. The greater the bit length, the greater the security.
5. In ‘File Name’ give the path where we want to save certificate request. In this practical, we have save this file in “C:\CertificateRequest\Request.txt” Click on finish to complete.
6. Now, open the certificate request from the location where we have saved it i.e. “C:\CertificateRequest\Request.txt” and copy all the content. Make sure that do not make any changes in this file. If you are requesting for external certificate then send this file to your certificate vendor.
7. Open Internet Explorer and type ‘http://dc04/certsrv‘ (Certificate Authority), through this address we’ll access the “Active Directory Certificate Services” WebSite, via this website we can request and retrieve certificates. Click on “Download CA certificate, certificate chain, or CRL”. This certificate is used to establish trust between client and Certificate Authority and would create secured https website using SSL Certificate.
8. On Download a CA Certificate, Certificate Chain, or CRL console, select Base64 and click on “Download CA certificate” to download this certificate.
9. Save the Certificate in your desired location. Here, we are saving it in “C:\Certificates” and rename this certificate to ‘Root‘.
10. Again Open Internet Explorer and type ‘http://dc04/certsrv‘ for requesting a certificate for the website to make it encrypt. Encryption will make the website secure for safe transferring of data.
11. On Request a Certificate console click on “advanced certificate request” for submitting a request for client certificate.
12. On Advanced Certificate Request console click on “Submit a certificate request by using a base-64-encoded CMC or PKCS#10 file, or submit a renewal request by using a base-64-encoded PKCS #7 file”.
13. On Submit a Certificate Request or Renewal Request console, paste the content of certificate request which we have created and saved it in”C:\CertificateRequest\Request.txt“, select ‘web server‘ from the drop down menu in Certificate Template. Click on submit to submit a request.
14. On Certificate Issued console select Base,64 encoded and download the certificate by clicking on Download certificate.
15. Save the Certificate in your desired location. Here, we are saving it in “C:\Certificates” and rename that certificate to ‘DomainCertificate’.
16. Open the folder where we saved our certificates and double click on Root certificate to install it.
17. On Certificate console click on ‘Install Certificate‘.
18. On Welcome to the Certificate Import Wizard, we can see all the elements perform by root certificate and have to select the store location where this certificate is kept. Click Next to continue.
19. On Certificate Store console either we can specify a location for the certificates or select ‘Automatically select the certificate store based on the type of certificate’ so that windows can automatically select a certificate store. Click on Next.
20. On “Completing the Certificate Import Wizard” we can verify all the specify settings. Click on Finish to start the import of certificate.
21. A confirmation box will appear regarding the successful import of the certificate.
22. Open IIS console and click on Server Certificates. Now click on ‘Complete Certificate Request‘ to complete and install the domain certificate.
23. On ‘Specify Certificate Authority Response’ console specify the path of the domain certificate (C:\Certificates\DomainCertificate.cer), give a friendly name and select the certificate store for the new certificates to Personal. Click on OK.
24. On Server Certificates console, we can verify that our domain certificate with name DC01 is listed in Server Certificates.
25. Open the bindings of the site by clicking on Edit Bindings.
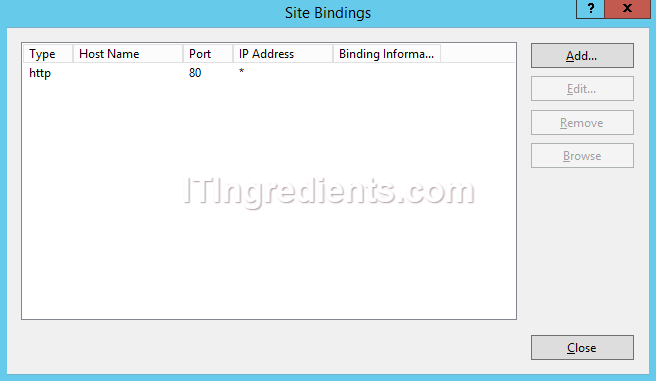
26. On Site Bindings console, we can see that this site is currently running on port 80. Click on Add to add a new binding.
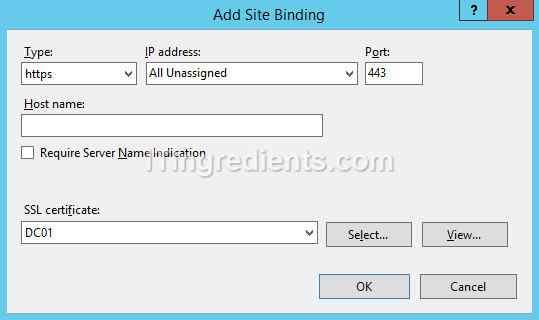
27. To create secured https website using SSL certificate, select https in type, verify the port 443 and select the SSL certificate (DC01) which we have installed. Click on OK to create this new binding.
28. Verify all the site binding settings and click on Close.
29. Open Internet Explorer and type FQDN in the address bar (https://dc01.itingredients.com) and hit enter. We can verify that this site is https site by the lock icon and https written before web address of the site. This clearly show that this website is running on port 443 and is encrypted.


