Install iSCSI Target Server on Windows Server 2012 R2
Install iSCSI Target Server on Windows Server 2012 R2
In this post, we’ll learn the steps to Install ISCSI Target Server on Windows Server 2012 R2. iSCSI (Internet Small Computer System Interface) is a protocol that is used for transmission of data.
What is iSCSI?
Internet Small Computer System Interface Target Server is a server components which works like a SAN (Storage Area Network) box and provides block storage to initiator. It is used to create SAN on Windows Server 2012 R2 and used as a Shared storage to share block storage over Ethernet. On the server you can create multiple partitions which can be accessed from multiple servers to save and access data. It was available for free download on Windows Server 2008 R2. However, from Windows Server 2012 onward Microsoft has provided iSCSI Target as a built-in features therefore no more additional downloads are required.
Steps to install iSCSI Target Server on Windows Server 2012 R2
Step 1:
To install ISCSI Target Server open Server Manager by either clicking on the icon next to Start button or click on start and start typing Server Manager.
On the Server Manager window, click on Add roles and features
Step 2:
Add Roles and Features Wizard would be started.
Click on next to continue.
Step3:
Select “Role-based or feature-based installation”.
Click on next.
Step 4:
Select the option “Select a Server from the server pool”.
Select the server from the “Server Pool” on which you are planning to install the role.
Step 5:
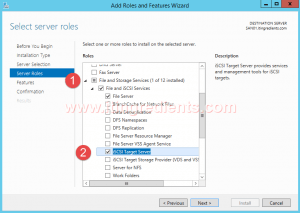
On the “Select server roles” console expand “File and Storage Services”.
Select “iSCSI Target Server”.
Click on next twice to continue.
Step 6:
On the “Confirm installation selections” console verify the Roles that we are planning to install. In case of any changes required click on previous and make the changes.
Click on Install to begin the installation process.
Click on Close once the installation is successfully completed.
Step 7:
To verify that installation, open Server Manager.
Select “File and Storage Services”.
If you see iSCSI option then it confirms that installation is successfully completed.
Hope you understood the steps the install iSCSI Target server on Windows Server 2012 R2. Please feel free to leave your comments and suggestions in the comment section.


