How to configure DFS Replication Group in Windows Server 2012 R2
Set up DFS Replication Group in Windows Server 2012 R2
In this article, we’ll learn the steps to Configure DFS Replication Group in Windows Server 2012 R2. A`Distributed File System (DFS) is used to organize distributed SMB file share into DFS Server. Distributed file system is used to replicate files and folders on multiple servers .
In this post we’ll talk about all the steps that are required and the pre-requisites of creating replication group. In replication group we create share folder on Computer ONE and another share folder on Computer TWO. Distributed File system would help in replicate data between both the servers. It helps in replicating only deltas and keep both the servers updated.
Please ensure that you have DFS Roles installed on all the servers on which you want data to be replicated.
How to Hide Drives using Group Policy in Windows Server 2012 R2
Steps to Configure DFS replication Group in Windows Server 2012 R2.
1. Click on start then click on down arrow to open DFS management console.
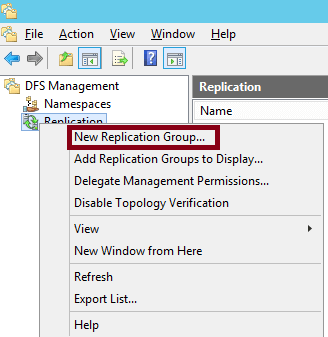
2. In DFS management console right click on Replication then click on “New Replication Group” to create new replication group.
3. In “Replication Group Type” we have to select the type of replication group. Select “multipurpose replication group”, this option helps us to configure replication between two or more servers for content sharing.
However, “Replication group for data collection” is used to replicate data between Hub and Branch Server. This option is used to collect data at the hub server. For this practical, we’ll select “Multipurpose replication group”. Click on next.
4. In “Name and Domain console” enter the name of the replication group. Here, we give Data_repl name of replication group. Select the domain name.
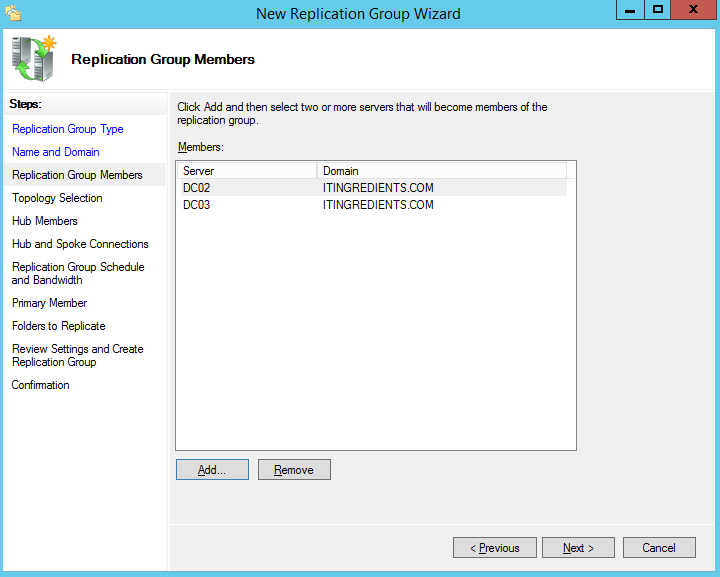
5. In “Replication Group Member“, click on ADD and browse the name of servers that you want to add as the members of replication group. Add all the servers between which you want to replicate the data. Data can be replicated between two or more servers. For this practical, we’ll replicate the data between two Computers i.e. DC02 and DC03.
6. In “Topology Selection” we have to select topology of connection between members of DFS replication group. Full mesh prevent the situation of single point of failure. Each member would replicate data with other members of replication group. In Hub and Spoke we would face an issue of replicating data if Hub is down.
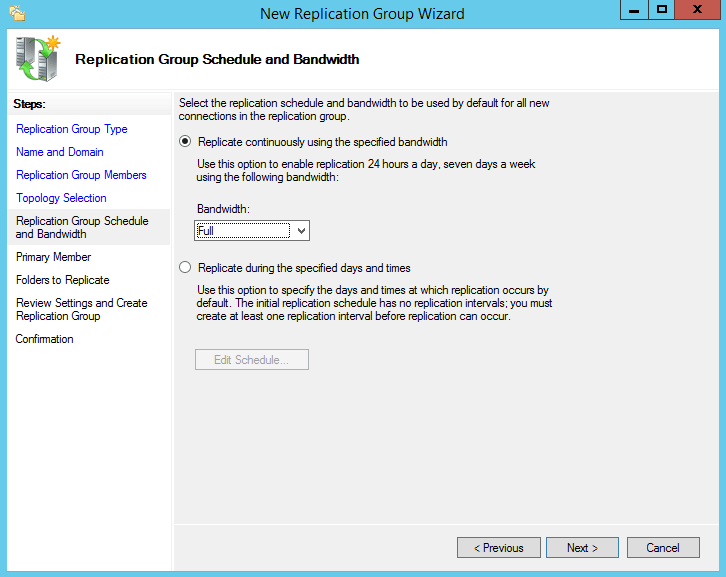
7. In “Replication Group Schedule and Bandwidth” window, select “replicate continuously using the specified bandwidth”. It gives you an option to restrict the amount of bandwidth for the data to be replicated.
This option is to be used to instant replicate the data between servers and not at defined scheduled time.
Select “Replicate during the specified days and times” if you don’t want replication to occur instantly or if you want to schedule the replication as per schedule.
8. To configure DFS replication group, in “Primary member Console”, select the server which you want to designate as the primary member. Primary member is considered to push data to all other partner servers. For this practical, we’ll select DC02 as the primary member. This means, during the initial replication it will replicate the data from DC02 to DC03 and not from DC03 to DC02.
9. In this console we would select a folder on the primary member that we want to replicate to other member of replication group. Click on ADD and browse the DFS shares that you want to replicate.
10. In this console, click on EDIT to select “Enabled” option then click on browse to give path of DFS share on DC03, which you want to replicate with DC02.
11. In the “review settings and create replication group” window, review the all selected settings. In case of any changes click on previous button else click on continue to create the new replication group.
12. In the “Confirmation window”, replication group is created successfully. Click on close.
13. Here, we can verify that our new replication group is created. Initial replication would take few minutes/hours to replicate depending on the link, data and connection between the computers.
14. Once the initial replication is completed successfully. Create a file or folder in any of the members of replication group and check if it is replicating data with other members or not. Initial replication would take some time, once the initial replication is completed then it would be instant.
15. To verify the replication between folders. The text file created in DC02(DC02\C:\dc02_DFS) would replicate to DC03 i.e. (DC03\C:\dc03_DFS).
Hope you understood all the steps that we have listed in this article to set up DFS replication group to replicate the data between multiple servers either intra-site or inter-site. Please don’t forget to like, share and comment your suggestions in the below mentioned comment section.
Articles you might be interested in:


