

How to configure Network Policy Server in Windows Server 2012 R2
How to configure Network Policy Server in Windows Server 2012 R2
In this post, we’ll learn the steps to configure Network Policy Server (NPS). In the previous post, we learned the steps to install the Network Policy Server in Windows Server 2012 R2. NPS allows you to create Network Access Protection (NA) for client health. Through NAP, we can restrict the network access or provide limited network access to the unhealthy clients from using organization’s network.
Let’s take a scenario, we have an OU naming Sales in Active Directory Users and Computers. We have to apply the Network Access Policy on the client computers in the Sales OU. NAP policy will verify if Firewall is enable on the client computers. If Firewall is not enable then it would block or restrict the network access. However, we can also define the policy to verify Antivirus and Anti spyware applications.
How to configure Network Access Protection in Network Policy Server
Step 1. Open Network Policy Server from the Administrative Tools in Start menu.
Step 2. On Network Policy Server console, click on “Configure NAP” to configure the NAP policy server.

Step 3. On Select Network Connection Method For Use with NAP console, select the Dynamic Host Configuration Protocol (DHCP) from the options in the drop-down menu of Network connection method.
Enter the Policy name and click on Next to continue.
In this practical, we have entered “NAP DHCP” as the policy name.

Step 4. On Specify NAP Enforcement Servers Running DHCP Server console, click on Add to configure Radius clients.
Remote Authentication Dial-In User Service (RADIUS) is set of rules that authorize and authenticate users when they connect to a network.
As DHCP Server services are running on this server therefore we can skip this setting and click on Next to continue.

Step 5. On Specify DHCP Scopes console, click on Add to enable the NAP policy on DHCP scope. We can do this later also.
If you don’t specify any scope here then this policy would be enabled on all the NAP enabled DHCP scopes.
Click on Next to continue.

Step 6. On Configure Machine Groups console, click on Add to add the group of machines to grant or deny access to the computers.
If no groups are selected then this policy applies to all computers.
Click on Next to continue.

Step 7. On Specify a NAP Remediation Server Group and URL console, enter the name of the Remediation Server Group, if we already have any configured in our environment.
Click on New Group to create a new Remediation Server Group.
Enter the URL of the web page, if a web page is configured to instruct the users for complying their devices with the NAP health policy.
As for Firewall it is not required therefore we can click on Next to continue.

Step 8. On Define Nap Health Policy console, all the installed system health validators are listed. Select the System Health Validator that we want to enforce with the health policy.
In this practical, we have selected “Windows Security Health Validator“.
Check “Enable auto-remediation of client computers” this will grant limited network access to NAP-capable client computers so that they can obtain software updates from remediation server.
If this option is not selected then the client computers cannot update automatically. We have to manually update them for full network access.
Check the option “Deny full network access to NAP-ineligible client computers.
Allow access to restricted network only“. So that, NAP-ineligible client computers can access restricted network for automatic updates from remediation server.
Click on Next to continue.

Step 9. On Completing NAP Enforcement Policy and RADIUS Client Configuration console, we can verify the options and policies that we have selected on previous consoles.
Click on Finish to complete this configuration.

Step 10. To configure Network Policy server, on the console, under Network Access Protection expand System Health Validators.
Now, expand Windows Security Health Validator. Under Settings, double click on “Default Configuration” to modify its settings.

Step 11. On Windows Security Health Validator console, choose policy settings for Windows Security Health Validator.
Here, we can define the settings for Windows8/Windows7/Windows Vista clients.
For Windows XP clients we can define it separately.
Here, we have to only enable “A firewall is enabled for all network connections” option for Windows 8/Windows 7/Windows Vista clients. Click on Ok.
This policy would check if Firewall is enabled for the client computers or not. If Firewall is not enabled then it would try to Enable the Firewall automatically else it would grant restricted access to user.

Step 12. To configure Network Policy Server, on the NPS console, expand Policies and click on Network Policies.
Now, click on NAP DHCP Noncompliant to modify the policy settings.

Step 13. On NAP DHCP Noncompliant Properties console, under Access Permission setting, the first option is “Grant access.
Grant access if the connection request matches this policy“.
When this option is enabled then the client computer connects to the network only when the connection request matches this policy.
The second option is “Deny access. Deny access if the connection request matches this policy“.
When this option is enabled then client computers cannot connect to the network if connection request matches this policy.
In this practical, we have selected the first option i.e. Grant Access. Click on Ok.

Step 14. Now go to DHCP Server, we have already configured a DHCP server and a scope is also defined to assign IP addresses.
We have to define our NAP policy on DHCP scopes.
On DHCP console, right-click on IPv4 and then click Properties.

Step 15. To configure Network Policy Server, on IPv4 Properties console, under Network Access Protection settings click on “Enable on all scopes” and select “Restricted Access” under the setting of DHCP server behavior when NPS is unavailable.
Click on Apply and Ok.

Step 16. To configure Network Policy server GPO needs to be created. On Group Policy Management console, right-click on the OU “Sales“.
Then click on “Create a GPO in this domain, and Link it here“.

Step 17. On New GPO console, enter the GPO name and click on OK.
In this practical, the name of our GPO is “NPS“.

Step 18. To configure Network Policy Server, right click on the GPO “NPS” and click on Edit to modify the GPO settings.

Step 19. To configure Network Policy Server, on Group Policy Management Editor console, we have to modify four policy settings for this GPO.
Following are the four policies:
- The path of first policy is “Computer Configuration\Policies\Windows Settings\Security Settings\Network Access Protection\NAP Client Configuration\Enforcement Clients“. Right click on “DHCP Quarantine Enforcement Client” and click on Enable.

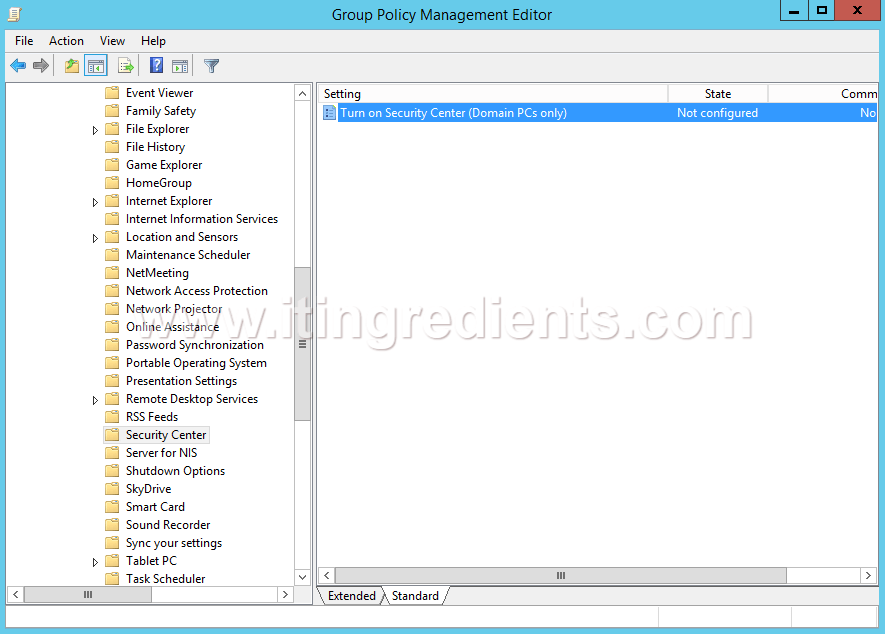
- The path of second policy is “Computer Configuration\Policies\Administrative Templates\Windows Components\Security Center“. Double click on “Turn on Security Center (Domain PCs only)” and click on Enabled to enable this policy.
- The path of third policy is “Computer Configuration\Policies\Windows Settings\Security Settings\System Services”. Double click on “Network Access Protection Agent” to modify its settings. On Network Access Protection Agent Properties console, select the option of “Define this policy setting” and select Automatic as service startup mode. Click on Apply and OK.

- The path of fourth policy is “Computer Configuration\Policies\Administrative Templates\Windows Components\Network Access Protection“. Double click on “Allow the Network Access Protection client to support the….” and click on Enabled to enable the policy.

Step 20. Now, go to any client computer that is part of OU “Sales” and is receiving the IP address from DHCP server.
Verify that the firewall is on.
If we try to turn off the firewall then NAP would again automatically turns on the Firewall because of NAP policies.

Hope you understood the steps to configure Network Policy Server for Firewall policies. Please share your experience, comments and suggestions in the comment section.
Thanks for the amazing article about Configuring Network Policy Server in Windows Server 2012 R2. Shall we follow the similar steps if configuring NPS over VPN?
Any detail article on remediation servers used with NPS?