

How to add Nano Server in Domain using DJoin Command
How to add Nano Server in Domain using DJoin Command
In this post, we’ll learn the steps to add Nano Server in Domain. In the old post, we learned the steps to Install and Configure Nano Server 2016 and steps to create and manage Nano Server 2016. By this tutorial you must be aware that Nano Servers are introduced by Microsoft in Windows Server 2016. Nano Server is a minimal footprint option announced by Microsoft. It gives an option to deploy only those packages that are required instead of installing all the packages and services. But the only disadvantage is that it doesn’t come with the option of Graphical User Interface (GUI). Therefore, we’ll use command prompt to add Nano Server 2016 in Domain.
Steps to add Windows Server 2016 Nano Server in Domain
Step 1:
On the Domain Controller run the command given below. DJOin command is used to offline join the domain (know more about offline Domain Join). In this command itingredient.com is the domain in which we want to add our Nano Server. Nano01 is the name of the machine and all the information would be saved in C:\odjblob file.
DJoin /Provision /Domain itingredients.com /Machine Nano01 /SaveFile .\odjblob

Step 2:
Once the command is successfully completed, it would provision the new Computer account in Active Directory in Computers container. By default all the Computer accounts are created in Computers containers.

Step 3:
To add Nano Server in Domain, next step is to move the Odjblog file to Nano01. We use Net Use command to map the C: drive of Nano01 with Domain Controller (Steps to promote Domain Controller using PowerShell Commands). To map the drive run the command given below.
net user I: \\nano01\C$

Step 4:
Once the command is mapped successfully, copy the Odjblog file to I: drive. You can do the same even from GUI i.e. Computer Explorer or from command by using the command given below. This file is required to add Nano Server in Domain.
Copy odjblob I:\

Step 5:
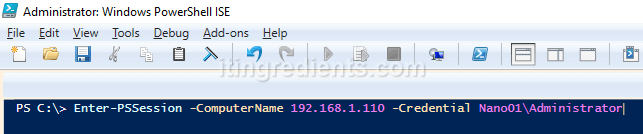
Take remote of Nano01 using the Enter-PSSession command given below. In this command we need to specify the IP address or Name and local credentials of Nano01. Type the local Administrator password once asked for.
Enter-PSSession -ComputerName 192.168.1.110 -Credential Nano01\Administrator
Step 6:
Once connected to Nano01 Server type the below mentioned command to assign DNS IP address. In this command “Ethernet” is the name of Network Adapter and 192.168.1.100 is an IP Address of DNS Server. DNS name resolution is important to add Nano Server in Domain.
netsh interface ip set dnsservers “Ethernet” static 192.168.1.100 primary

Change IP Address using Command Prompt
Step 7:
On Nano01 run the command DIR to check if C: drive has Odjblog file that we copied.
Now to add Nano Server in itingredients.com Domain run the below mentioned command.
DJoin /RequestODJ /LoadFile C:\Odjblog /WindowsPath C:\Windows /LocalOS

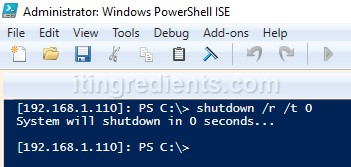
Step 8:
Once the command is completed successfully, reboot the Server using the below mentioned command:
shutdown /r /t 0
Step 9:
Once the server is restarted, enter User name, Password and Domain name to login to Server.
Once logged in we can verify that this server is successfully added to Domain itingredients.com.

This concludes the steps to add Nano Server to Domain, hope you enjoyed this article. In the next post, we’ll learn the steps to remotely manage Nano Server using PowerShell and GUI (Graphical User Interface). Please feel free to leave your comments and suggestions in the comment section.