

How to Configure DHCP Server Reservation in Windows Server 2012 R2
How to Configure DHCP Server Reservation in Windows Server 2012 R2
In this post, we’ll learn the steps to Configure DHCP Server Reservation in Windows Server 2012 R2. Dynamic Host Configuration Protocol (DHCP) is used to provide dynamic IP address to the computers in a network. In the previous posts, we have learned the steps to Install and Configure DHCP server. Now in this post, we will learn the steps to Configure DHCP Server Reservation.
DHCP server reservation is used to reserve a specific IP address for a particular computer in a network. Using DHCP reservations, administrators can assign a permanent IP address to the client computers without configuring static IP addresses manually, it can also be used to assign an IP address to Servers but it is not recommended. It will eliminate the efforts of configuring static IP addresses on servers and client computers which require same IP address.
Steps to Configure DHCP Server Reservation in Windows Server 2012 R2
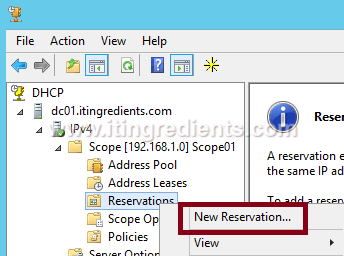
1. Open DHCP, right click on Reservations and then click on “New Reservation” to create a new reservation of an IP address for a particular MAC address.
2. On New Reservation console, enter the reservation name, IP address, and MAC address. Click on Add to create this reservation. In this practical, we have entered “Win8-Reserve” as a reservation name. We are reserving 192.168.1.45 IP address for the client computer having 00-0C-29-6B-BB-E4 MAC address. We can find out the MAC address of the client using the command “getmac“.

3. On DHCP console, under Reservations, we can see that the reservation naming “Win8-Reserve” is created sucessfully.

4. On client computer for which we have created a reservation, open command prompt and use the command “ipconfig /release” to release existing IP Address and then use the command “ipconfig /renew” to renew an IP Address.
Through this command, the client computer will renew its lease of IP address from the DHCP server. Here, we can see that this client computer is obtaining 192.168.1.45 IP address from the DHCP. It clearly shows that the DHCP reservation is working properly.

5. Again on DHCP console, click on Address Leases under the DHCP scope. Here, we can see that the IP address 192.168.1.45 is assigned to the client naming “Win8-1.itingredients.com“. It also shows that the reservation is active.

Hope you understood the steps to Configure DHCP Server Reservation in Windows Server 2012 R2. Please feel free to leave your comments and suggestions in the comment section below.