
How to configure forward lookup zone in Server 2012 R2
How to configure forward lookup zone in Server 2012 R2
In old post, we already talked about the steps to install DNS server in Windows Server 2012 r2. In this article, we’ll talk about the steps to configure forward lookup zone in Server 2012 R2. As we know that DNS is used for name resolution, it resolves host name to IP address and IP address to host name.
Forward lookup zone is used to resolve Hostname to IP Address, it automatically gets installed and configured in Domain Controllers but we have to install DNS and configure Forward Lookup zone for Member Servers.
In addition to that we also need to install and configure Reverse DNS lookup if we want IP Address to Name resolution to be working.
Also read: Steps to Promote Domain Controller
Steps to configure Forward Lookup zone
1. To configure Forward Lookup zone on Windows Server 2012 R2 DNS Server, click on Start button, select the down arrow and select DNS. This would open DNS manager. It can also be open by typing “dnsmgmt.msc” in run or in command prompt.

2. In DNS manager, expand the name of Computer. Right click Forward lookup and select “New Zone”.

3. On the welcome wizard, click on next to continue.

4. In the “Zone type” window, select the type of DNS that you want to use. For this practical we’ll use Primary.
Option store the zone in Active Directory is greyed out because we don’t have Active Directory installed on this server. This option will only be available on Domain Controller in which we have Active Directory installed. Click on next to continue.
Types of Zones:
a) AD Integrated: It can only be configured on Domain Controller. In Active Directory integrated zone, DNS data would replicate with Active Directory. For redundancy and load balancing, we can install DNS on all the Domain Controllers.
b) Primary: In primary zone, data is not integrated with AD. A local file will be created on the DNS Server in “c:\windows\system32\DNS” folder. We can have only 1 Primary DNS server in our domain and it doesn’t replicate data with another DNS. All the client computers are supposed to point to Primary for name resolution.
c) Secondary: Secondary zone is primarily used for remote sites and for small environments. It is the read only copy of Primary. You can review the Steps to create secondary zone in future articles. It also helps in fault tolerance. Secondary is used to transfer the zone data from Primary.
d) Stub: This is also a read only copy but we only have three types of records in Stub Zone i.e. Nameserver (NS), Start of Authority (SOA) and glue Host (A) records. Stub zone is primarily used for saving the bandwidth as it doesn’t transfer all the zone data but only the required records.

5. Type the name of Domain for which you are configuring DNS. For this example we’ll consider the name itingredients.com as the Domain name. Click on next to continue.

6. It would give you an option to either create a new Zone file or use and existing Zone file. We are creating first DNS and don’t have any existing file to be used therefore we’ll create new file. Click on next.

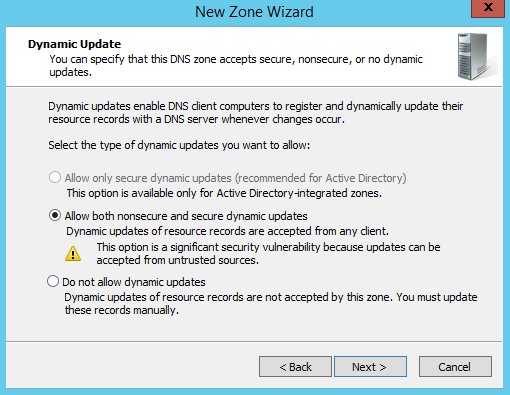
7. In Dynamic Update window, select an option “Allow both nonsecure and secure dynamic updates”. Dynamic update will automatically update records of client machine i.e. if you change and IP address of any client machine, it would be changed on the server automatically. It will prevent manual intervention. Click on Next.

8. On the “Completing the New Zone Wizard”, click on Finish to complete the wizard.

9. We can go back to the DNS Manager window to check if the new forward lookup zone is created or not.

10. Select the zone, to check all the records created in that. We can see SOA and NS records are created automatically.

11. Let’s create a Host (A) record that would be used to resolve host name to IP. Right click on Zone name and select “New Host (A or AAAA)”.

12. In the new host window, type the New host name. As we are creating record for this server and it’s name is DC06. Type the associated IP that this name will resolve to, for this example we’ll use 192.167.1.70. We can also select an option “Create associated Pointer (PTR) record” if we have Reverse Lookup zone configured in our environment.

13. Once the record is successfully created, it would show the confirmation message. Click ok to close the pop-up.

14. To check if the record is successfully created or not. Select Zone name, it would show Host(A) record on the right frame.

Hope you understood the steps to configure Forward Lookup zone in Server 2012 R2. To check if it’s working or not. Open command prompt on your box and ping the name DC06, it would show you the IP Addresss. Another option is to open command prompt and type nslookup DC06, it would resolve the host name DC06 to IP Address. NSLookup is a tool used to check the functionality of DNS.
Articles you might be interested in: