How to install Network Policy Server in Windows Server 2012 R2
How to Install Network Policy Server in Windows Server 2012 R2
In this post, we’ll learn the steps to install Network Policy Server. NPS allows us to enforce network policies of the organization to the client computers. Network administrators can configure Network Access Protection (NAP) on NPS server. Through NAP, they can create network policies based on system health, software & system update requirement and enforce them on the client computers in the network. Please ensure you have DHCP Server in your environment to perform this practical.
Steps to install Network Policy Server
1. Open Server Manager and click on “Add roles and features” to install the role of NPS.
2. On Before you begin console, we can read all the pre-requisite tasks to be performed before proceeding further. Before installing any role, please verify that administrator account must have a strong password, network settings such as static IP address is configured. Click on Next to continue.
3. On Select installation type console, select “Role-based or feature-based installation” and click on Next to continue.
4. On Select destination server console, select the server from the server pool on which we want to install the role. Click on Next to proceed. In this practical, there is only one server available which is DC01.itingredients.com.
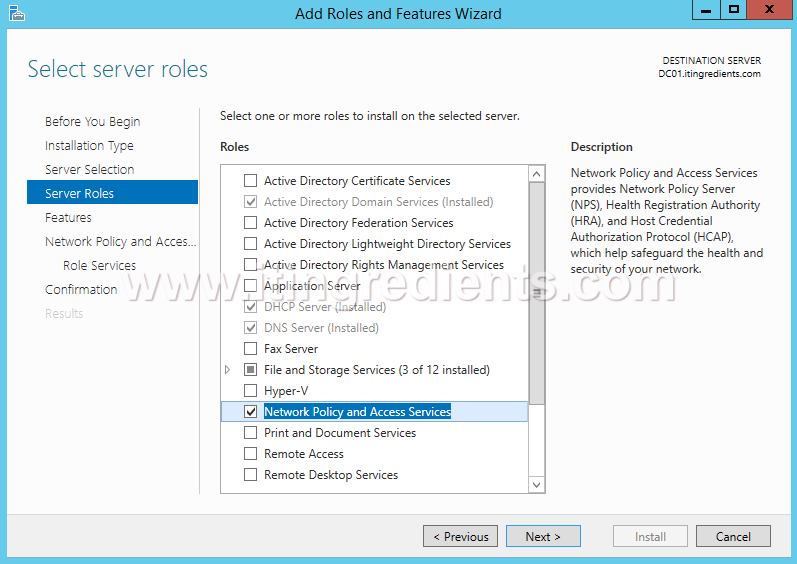
5. On Select server roles console, select the role of “Network Policy and Access Services“. A dialog box appears regarding the features required for Network Policy and Access Services. Click on Add Features.
6. To install Network Policy Server, on Select server roles console, we can verify that the role of “Network Policy and Access Services” is selected for the installation. We can also read its description here that this role provides the NPS, HRA, and HCAP which will safeguard the health and security of our network. Click on Next to continue.
7. On Select features console, we don’t have to select any feature to install. Just click on Next to proceed.
8. On Network Policy and Access Services console, we can read the importance of this role. Network Policy and Access Services allows us to define policies for securing our network, authorization and client health using NPS, HRA, and HCAP. Network Access Protection (NAP) ensures that computers connecting to your network are compliant with organization network and client health policies. After installing Network Policy Server you can configure Network Access Protection. Click on Next to continue.
9. On Select role services console, select Network Policy Server and click on Next to continue.
10. On Confirm installation selections console, verify all the options selected on previous consoles. Click on Install to install this feature.
11. On Installation Progress console, we can see the installation progress. When the installation is successfully completed then click on Close to close the console.
Hope you understood the steps to install Network Policy Server on Windows Server 2012 R2. In the next article, we’ll learn the steps to configure Network Access Protection. Please feel free to share your comments or queries in the comment section.


