
How to Install Citrix Xenapp 6.5 Step by Step
How to install Citrix XenApp 6.5 for Application Virtualization
Citrix is a pioneer in application virtualization and desktop virtualization. It allows end users to access the application on almost any device e.g. local machine, tablet, mobile, MAC computer, etc, without installation application on their device. Application virtualization gives the same look and feel as if application is installed locally on computer. In this article, we’ll learn the steps to install Citrix XenApp 6.5 on Window Server 2008 R2. Citrix XenApp requires multiple roles to be deployed. Visit the link to download Citrix Xenapp for Application Virtualiztion.
We’ll take real life example and would install all the roles that are required for Application virtualization. Some of the roles that we need to deploy are Citrix XenApp, License server, Web Interface and Database Server. We have provisioned Domain Controller and named it DC01 (How to promote a Domain Controller or How to promote a Domain Controller using PowerShell). We installed Citrix XenApp on two servers to load balancing our environment and named them CTX01 and CTX02. In case of contingency, if CTX01 goes down CTX02 will take over responsibility of application virtualization and handle the load. End users will browse a website to access virtual applications for that Web Interface is required, we have named it WI01. Citrix licenses and database are also required, in real life you can install them on separate servers but we have installed database on CTX01.
Steps to install Citrix XenApp 6.5
1. To install Citrix application virtualization, insert the DVD of Citrix XenApp 6.5.
2. Right click on DVD and click on “Install or run program from media”.

3. Select “Install XenApp Server”. Roles can also be installed individually by selecting “Manual install components”.

4. Dot net 3.5 is the prerequisite for application virtualization, click on ok to install dot net 3.5 sp1.

5. Once the installation is completed, click on “Add server roles” to being with the installation of Citrix XenApp 6.5.

6. Out of platinum edition, enterprise edition or advanced edition, select the XenApp edition that you want to install. Platinum edition includes advanced options and addition tools. Additional licenses are required to use Platinum Edition features.

7. On the “License agreement” window, read the agreement, accept if agree. Click on next to continue.
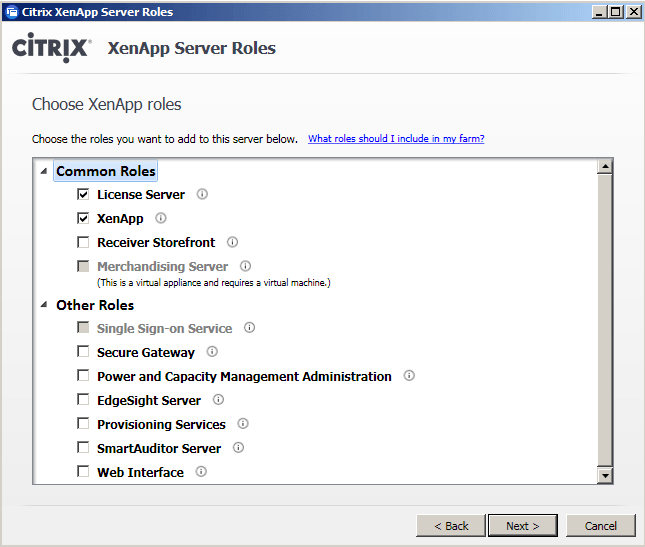
8. On the “Roles” window, select XenApp and License server role. You can even install these roles on different servers but for this practical, we’ll install them on the same server. Click next.

9. Select an option “XML Service IIS integration”. This would assign port number 80 to XML service. Don’t select this option if you want different port number assigned to XML service. However for this practical we’ll integrate XML service with IIS therefore select this option.

10. On the “Review prerequisites” window, review the list of roles and features that would be installed. Click on next to continue the installation.

11. Clicking on “Install” will begin the installation of all the components mentioned in this ready to install window.
12. Installation is interrupted as restart is required. Restart the computer.

13. After restart, open “Role Manager” and click on “Resume Installation”. This would resume the installation.

14. In “Ready to Install” window, click on Install to begin the installation.

15. Message “Successfully updated XenApp server roles” confirmed that all the components and prerequisites are installed successfully.

You might also be interested in:
- How to configure Citrix XenApp 6.5
- How to publish applications on Citrix
- How to load balance Citrix environment.