

How to Share a Folder from GUI, Command and Sever Manager
Steps to Share a Folder in Windows Server 2012 R2
Before we start with the steps of Sharing a folder, let’s understand the scenarios in which Share folder is required. Share folder is required to share the folders and files with the domain users. If you have some files and folders on your Computer and you want to share them with your colleagues then you can Share a folder and your colleagues can access the share.
There are three ways to share a folder from GUI, Command prompt and from server manager.
How to Share a Folder from GUI
1. To share any existing folder, right-click on the folder which you want to share. Here, we have a folder named as Sales. Right click on the folder then click on properties to open folder properties.

2. In folder properties, on Sharing console click on advance sharing to share the folder and define permissions related to the share folder.

3. In “Advance Sharing” console check on “share this folder” to share the folder on the network and define the share name. Share name would be used by end user to access this folder. It can be different from Folder Name. Click on OK.

4. To access this share folder from any other computer first ensure, that your computer is on the same network on which the computer having a share folder is. For accessing the share folder open Run and type the network path of the computer having share folder and click on OK. In this example network path we used is \\dc01 .

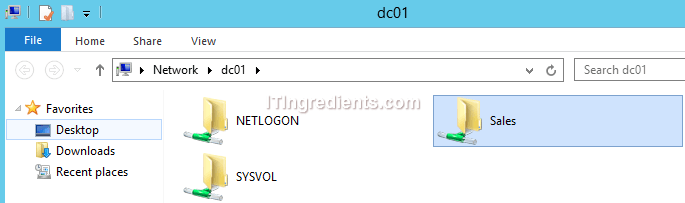
5. On the network location, we can see three folders which are Netlogon, SYSVOL and Sales. Netlogon and SYSVOL are by default shared of the domain controllers. Sales is that folder which we have shared and also access this folder from here.
6. Here, we can see all the content in the share folder and access those files also. Try accessing the file, try to modify contents. We cannot modify them because we have not defined any permissions for domain users by default all the domain users have read-only permissions on the share folder.
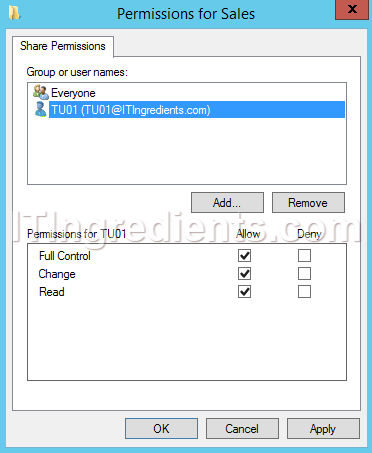
7. To make users modify the files in share folder, we have to give permission to the users. Open share folder properties and then open Advance Sharing. On the console of Advance Sharing, click on Permissions to define user permissions on share folder.

8. On “Pemissions for Sales” console, click on Add to add users or group of users so that we can define permissions. After adding a user, select that user and give the permissions. Click on apply and Ok. In this example, we have given “full control allow” permission on Share folder Sales to user Tu01.
9. Now we will login with the credentials of user Tu01 on client computer and access the share folder. After making all the modifications in the document in the share folder we will try to save the document. And the document would be saved without any problem because we have give full control access to the user on share folder.
Adding Multiple Share Name to Share Folder
Share name is that name of the share folder through which the folder can be accessed through a network. A folder can be accessed by network only through its UNC path. UNC path is Universal Naming Convention. Generally, the UNC path of any share folder is like “\\computer name\folder name“. We can assign more than one share name to the share folder also. This can be an interview question.
1. Open the properties of share folder, then click on Sharing and then click on Advanced Sharing. On Advanced Sharing console click on Add to add a new share name to the folder. Currently we have share name “Sales” assigned to the Share folder.

2. On New Share console, enter the new share name in Share name field and click on OK. For this practical we’ll assign another Share name i.e. Purchase. Please ensure we can define different permissions for different Share name. Click on permission to define the permissions.

3. On Advance Sharing console, we can see all the share names of this folder in the drop-down menu of Share name settings. Click on Apply and Ok to apply these settings.

4. Now we again access the DC01 through network and see that different share folder appears, having different names. Sales and Purchase are showing as two share folders but they both are pointing to the same folder.

How to Share a Folder from Command Prompt
We have created a folder with the name Sales on the C: drive, now we’ll share this folder from command prompt.
1. Open command prompt and type command “net share sales=c:\sales“. In this command sales is the share name of the folder which we want to share and c:\sales is the local path of the folder which we want to share. We can define any share name as per your requirement.

2. Open command prompt on the client computer and type “net view \\dc01” to view all the share folders of DC01. Net view command is used to list share folders of remote server.

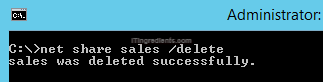
3. To disable the sharing of any folder through command prompt, go to the server on which you want to disable the share folder, type “net share sales /delete” and hit enter. Sales is the name of that share folder and not the folder name. Through this command folder will not be deleted only sharing of that folder will be disabled.
How to Share a Folder through Server Manager
1. Open server manager, click on file and storage services.

2. In “file and storage services” console click on volumes, then click on “start the add roles and features wizard” to install the role of file and storage services.

3. In the select destination console, we have to select the server on which we have to install the role. Here we are selecting DC03.ITIngredients.com. Click on next.

4. In “Select server roles” console check on “File and iSCSI Services” under File and Storage Services role. Click on Next to continue.
5. In the “select feature” window, all the dependent features are already selected. We don’t need to select any additional feature. Click on next to continue.

6. Check the option “Restart the destination server automatically if required”, this would restart your Computer after role is successfully installed. Click on install to begin the installation process.
7. Here, we can see installation are in progress, once the installation is completed click on close.
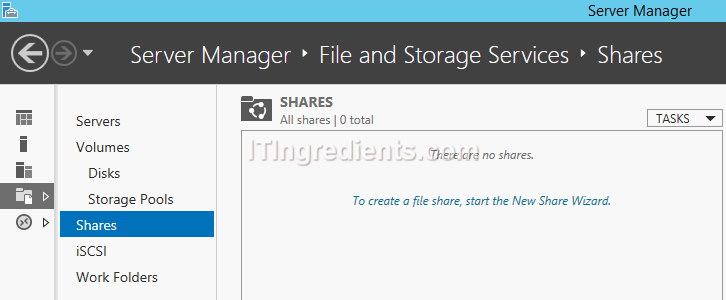
8. In “file and storage services” console click on “Shares” to share a folder by click on “To create a file share, start the New Share Wizard“.
9. In the New Share wizard select the profile for sharing a folder. There are two types of file share profile SMB Share – Quick, Advanced, Applications and NFS Share – Quick, Advanced. Here we select the SMB share – Quick. SMB share – Quick is the fastest way create a share folder with general file sharing settings and advanced features can be configured later through folder properties. Whereas, SMB share – Advanced provides an additional option to share a folder with permissions of allow or deny access, set folder owners and enables quotas.

10. In this console, we will select the server and volume in which we will create the folder first then we will share it. Or click on “Type a custom path” for sharing an existing folder, click on browse to specify the local path of the folder. Click on Next to continue.

11. On the “Specify share name” console, enter the share name of the folder. Enter the share description if required. Verify the local and remote path of the share folder and click on next to continue.

12. On “Configure share settings” console check on Enable access-based enumeration option to display only those files which user has permission to access and if user don’t have read permissions for this share folder, user cannot see this folder. Or check allow caching of share to make the content of share folder available to offline users. Otherwise, you can check Encrypt data access to secure the data against unauthorized access. Select the option according to your requirements and click on next.

13. On “Specify permissions to control access” console click on customize permissions button to customize the permissions of users on a share folder.

14. On “Select User, Computer, Service Account, or Group” console enter the name of the user or users or group of users and click on Ok.

15. On “Permission Entry for Share” console, select allow or deny from the drop down menu of the type settings and select the permissions which you want to deploy on a user. Here, we have given full control allow access to the user TU01. Click on Ok.

16. In this console we can modify the permissions by selecting that entry and then clicking on edit. Change the owner of the folder if required. Otherwise, click on apply and OK to continue.

17. On the “Confirms selections” we can verify all our selections on previous consoles. If want to make any changes click on previous and make changes or click on Create to create a share folder.

18. On the “View results” console we can verify that this folder is shared successfully and click on close to close this console.

19. Now on Server Manager under Shares of File and Storage Services role, we can see all our share folders and their complete details from this console.

Conclusion:
This could be an interview question, how to share a folder on Server. More you know more are the chances to get selected. If you only explain one way then it’s good but if you can explain more than one way to share a folder then it shows that you extensively studies about the topic and have working knowledge. To answer this question you can explain that a folder can be shared either from GUI mode, or from command prompt or from Server Manager. Don’t forget to comment about the method you are using the most in your organization.