

Implementing VMWare Single SignOn (SSO) using VMWare WebClient
Implementing VMWare Single SignOn (SSO) using VMWare WebClient
In this post, we’ll learn the steps to implement VMWare Single SignOn using VMWare WebClient on VMWare 6. In the old posts, we have learned the steps to install and configure VMWare ESXi, install and configure vCenter Server. VMWare ESXi 6 make it’s own domain with the name of VSphere.local and we need to login to vCenter Server using the domain vSphere.local domain. This would result to an issue if we have to delegate access to a user who is part of our Organization’s domain because SSO is not configured by default.
By implementing VMWare Single SignOn using VMWare webclient we can allow Domain user to access and administer VMWare environment. Single Sign On also helps in delegating permissions to domain users. VMWare introduced Single Sign On (SSO) first time in ESXi 5.1. SSO is configured using WebClient and not by using vCenter Server. Please take a note, VMWare is planning to deprecate vCenter Server in the upcoming versions.
Steps to configure VMWAre Single SignOn using VMWare WebClient
Step 1:
Login to vCenter Server (Steps to install and configure vCenter Server)
Click on start and then click on down arrow and select VMWare vSphere WebClient.
Steps to configure High Availability using vCenter Server
Step 2:
Login by using the credentials Vsphere.local\Administrator, enter the password that you have specified while configure vCenter Server

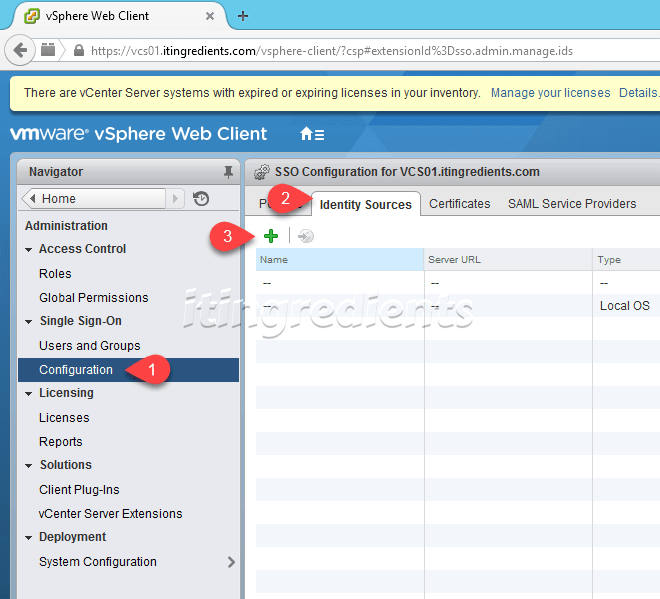
Step 3:
On the WebClient client, click on “Administration”.

Step 4:
Click on Configuration
Click on Identity Sources
Click on + sign to configure SSO.
Step 5:
In the “Identity source type” select “Active Directory (Integrated Windows Authentication)“. (Steps to promote Domain Controller)
In the Domain name specify the Domain name you have configured in your Organization. For this practical we have used itingredients.com as the Domain name.
Click on Ok to add implement VMWare Single SignOn using WebClient.

Step 6:
Once the Domain name is added successfully we can see the same in the Identity Sources.

Step 7:
To confirm if SSO is configured properly or not, click on “Global Permissions”.
Click on Manage tab.
Click on + sign.

Step 8:
Under Users and Groups click on Add. We would talk about Global Permissions in the future articles. This option is used to define delegation and permissions.

Step 9:
Click on the Domain drop down option, if you can see Domain name i.e. itingredients.com then it confirms that SSO is configured successfully.

This concludes the tutorial of implementing VMWare Single SignOn using WebClient. Hope you enjoyed this article, please feel free to leave your comments and suggestions in the comment section. In addition to that don’t forget to like our Facebook page and share this article with your friends and colleagues.