How to Promote Domain Controller with Windows PowerShell- Server 2012 R2
How to Promote Domain Controller with Windows PowerShell- Server 2012 R2
In this post we’ll learn the steps to promote a Domain Controller with PowerShell. As we know that Domain Controller is required for centralized management of your Domain. There are multiple ways of promoting a Domain Controller. In other post we have already learned the steps to promote a Domain Controller with GUI.
PowerShell is a great tool Microsoft has provided in their Operating Systems. PowerShell can be used to create scripts and automate tasks.
Steps to promote Domain Controller with Windows PowerShell
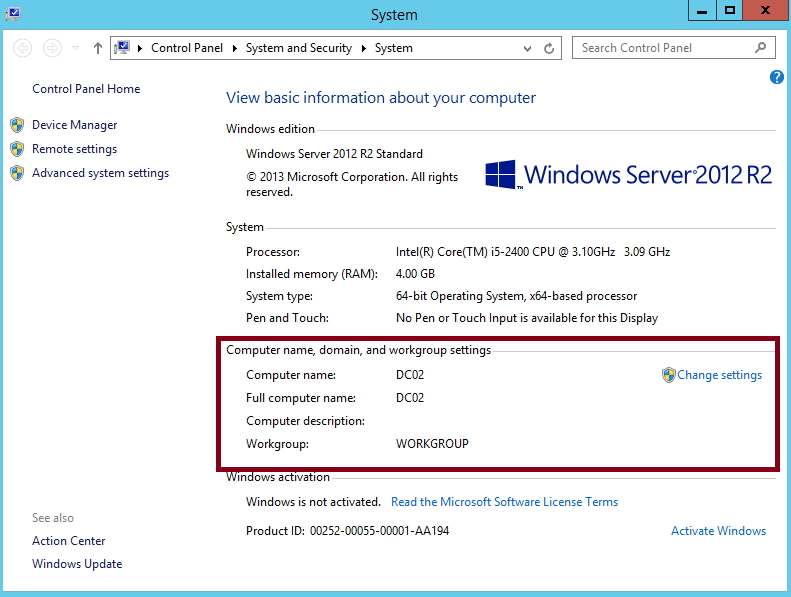
1. To start with right click on start button and click on System.
2. In System, we can see the current status of Server. On this box, we have deployed Windows Server 2012 R2. Computer name is DC02 and this computer is part of workgroup.
3. To start with, open PowerShell.
4. We need to install the role “AD DS” (Active Directory Domain Services role). To install the role type “Install-WindowsFeature -name AD-Domain-Services -IncludeManagementTools“.
AD-Domain-Services is the alias name of AD DS role. To manage DC we need to install Active Directory Users and Computers management tool, Active Directory Sites and Services, Active Directory Domains and Trusts, etc. To install these tools we need to use the switch “-IncludeManagementTools”.
5. After installation is completed, please ensure that Success should be true and exit code should be Success. This confirms that installation is completed successfully.
6. After AD DS role is installed, next step is to promote the box as a DC. But it is recommended to check all the pre-requisites before initiating Domain Controller promotion process. Run the command “Test-ADDSForestInstallation -DomainName itingredients.com -InstallDns“, hit enter and type “SafeModeAdministratorPassword” and confirm the password again.
Explaining command and switches:
DomainName: It is to define the name of domain. In this example we have used “itingredients.com”.
InstallDns: This switch is used because we also want to install DNS while promoting this box as DC.
SafeModeAdministratorPassword: Define the password for Active Directory Restore Mode and please ensure that you remember this password while restoring Active Directory object. We’ll discuss restoration of objects in future articles.
7. During testing forest installation, server will check if valid IP address is assigned to the computer or not. It will check if the DNS IP address is assigned or not. In addition to that it will also check if password is set for local Administrator or not.
8. After test is completed it will show the confirmation message. If the status is “Success” then we are good to begin with the Active Directory installation steps. In case of any warning, we can ignore them but in case of error we need fix them before we start with the Active Directory installation process.
9. To promote the server as a DC we need to install new Forest. To install new forest run the command “Install-ADDSForest -DomainName itingredients.com -InstallDNS“.
Explaining command:
Install-ADDSForest: This PowerShell command is used to create new Forest.
Domain: This switch is used to define the name of the Domain.
InstallDNS: This switch is required if you want to install DNS along with Active Directory.
SafeModeAdministratorPassword: Safe mode password is actually a Directory Services Restore Mode password. We’ll use this password while restoring Active Directory. In the future article we’ll talk about the steps to recover users and OUs by using backup.
10. While running the install forest command, it would confirm if we want to configure this box as a domain controller and restart the computer when operation is completed. Type “A” for “Yes to All” and hit enter. This would start validating environment and user input and promote this box as a DC.
11. Once the installation is completed, check the status message to confirm if the computer is successfully promoted as a Domain Controller or not. As we can see that “Success” in status, this confirms that this server is successfully promoted as a DC.
12. The server will be restarted automatically. After restart opens the PowerShell and type the command “Get-ADDomainController“. This PowerShell command will give you details about all the DCs you have in your environment.
13. By default all the DCs goes directly to “Domain Controller’s Organization Unit“. ComputerObjectDN shows the complete patch of the server. It shows that this computer i.e. DC02 is in OU=Domain Controllers. New forest is created as itingredients.com and computer name is changed to DC02.itingredients.com.
Hope you understood the steps to promote Domain Controller using PowerShell. Feel free to leave your comments and suggestions in the comment section.


I guess we can also create a script using the PowerShell commands to promote Domain Controller. If we don’t need any manual intervention..