How to set up Machines for Desktops and Applications in XenDesktop 7.8
How to set up Machines for Desktops and Applications in XenDesktop 7.8
In this article, we’ll learn the steps to set up machines for Desktop and Applications in XenDesktop 7.8. Before we start with the steps to configure Machine catalog, check articles to configure the site in Citrix XenApp\XenDesktop 7.8. Configuring site not only creates the connection to the Hypervisor but it also helps in delivering applications and desktops to users. In this post, we’ll learn the steps to configure machine catalog. Machine Catalog is a collection of physical or virtual computers that would be assigned to users for accessing applications and desktops.
Steps to set up machines for Desktops and Applications (Machine Catalog)
1. To set up machine catalog, open Citrix studio from the Start menu. On the console of Citrix Studio click on the option of “Set up machines for desktops and applications or remote PC access“.
2. On Introduction console, we can read about the machine catalog and all the pre-requisites to be completed before configuring it. Machine Catalog are the collection of physical and virtual machines that can be assigned to users for accessing desktops and applications. An important note is also there that the master image or physical machine that we use to create machine catalog should have Virtual Delivery Agent installed. Click on Next to continue.
3. Machine Catalog setup gives the option to select the Operating System that needs to be deployed. Select the option of “Desktop OS” for deploying Client OS and select “Server OS” to deploy Server Operating System. In this example, we’ll deploy Client OS therefore select “Desktop OS“. Click on Next to continue.
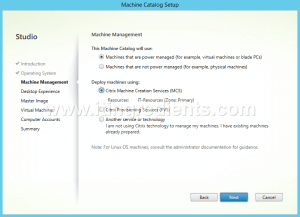
4. Machine Catalog provides two options for machine management
a) Machines that are power managed: This option is primarily for the Virtual Machines or Blade PCs.
b) Machines that are not power managed: This option is primarily for the Physical Machines.
In addition to that we have three options to deploy machines i.e.
a) Citrix Machine Creation Services (MCS)
b) Provisioning Services (PVS)
c) Another service or technology: This option is used when we are not using Citrix technology to manage VMs and have existing machines.
For this practical, we’ll select Virtual Machines using MCS to deploy Virtual Machines. Click on Next to continue.
5. On Desktop Experience console, under the setting of “Which desktop experience do you want users to have?”
a) Random Desktops: It creates pool of Virtual Machines and user would get random VM when they logon. It is not persistent i.e. it would discard all the changes when user would logoff. Selecting this option will disable all the options mentioned under that.
b) Static Machine: This option will create dedicated machine for the user and user will login to the same machine when they login. It enables three options:
i) You can select an option to save the data on the personal vDisk (PVD)
ii) It gives you an option to save the data on the local Hard disk.
iii) Discard all the changes when user would logoff.
You can select the option as per your requirement. For this practical, we’ll select Static Desktop for the user. Click on Next to proceed.
6. On Master Image console, select the master image which will be used as the template for all the virtual machines in this machine catalog. You will see list of all the VMs available on the Hypervisor. Select the master image which you want to use to create other VMs. For this practical, we’ll select Win7Temp as the master image for all the virtual machines in this machine catalog. Please ensure you have VDA installed and configured on the master image. Click on Next to continue.
7. On Virtual Machines console, select the number of machines that you want to provision and define the configuration of machines like Virtual CPUs and Memory in MB. Here, we are creating two virtual machines with 1 CPU and 2048 mb of memory. Click on Next to continue.
8. On Active Directory Computer Accounts Computers, under Select an Active Directory account option we have selected “Create new Active Directory Accounts“, you can select “Use existing Active Directory accounts” if you already have Computer accounts created in the AD. Under Active Directory location for computer accounts select the OU (how to create OU) in which you want to save newly created Computer objects. We have set the Account naming Schema to “Win7-##“. It means that the machine’s naming convention will starts from Win7-01. Click on Next to proceed.
9. To set up Machines for Desktops and Applications in XenDesktop 7.8, on the summary console, verify all the options. Enter the Machine Catalog name and description. We have entered “Win 7 IT” as the machine catalog name and “Win 7 IT Machines” as the description. Click on Finish to complete the process.
10. This process would use the connection object to connect to Hypervisor and create the Virtual Machines.
Note: Please ensure you have DHCP Server configured in your environment. All the newly created Virtual Machines would take Dynamic IP Address from the DHCP Server.
Hope you understood the steps to set up Machines for Desktops and applications in XenDesktop 7.8 on Windows Server 2012 R2. Feel free to leave your comments if you have any suggestion or queries.


