How to Install and Configure Citrix Web Interface
How to Install and Configure Citrix Web Interface (WI)
We already learned the steps to install Citrix Xenapp 6.5 and steps to configure Citrix XenApp 6.5. In this article we’ll learn the steps to install and configure Citrix Web Interface on Windows Server 2008 R2. It is used by end users to access applications. A website would be created on the WI which will be accessed by users to access virtual application.
1. To configure Citrix Web Interface insert the DVD of Citrix XenApp 6.5, right click on DVD and select an option “Install or run program from media”.
2. Select “Install XenApp Server”.
3. Dot net 3.5 SP1 is the prerequisite to install Citrix Xenapp components. Click on yes to install .Net 3.5 SP1 Framework.
4. Select “Add Server roles”.
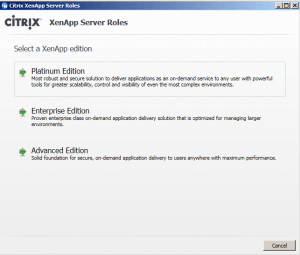
5. Select the XenApp Server role from Platinum, Enterprise or Advanced. WI is the part of all of them, for this practical, we’ll select Platinum edition.
6. Read the license agreement, accept the terms if you agree with the agree with the license agreement.
7. In “Choose XenApp roles”, select Web Interface.
8. All the dependent components will be selected automatically.
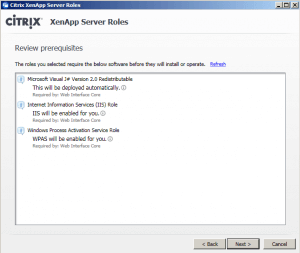
9. Review the prerequisites that would be installed automatically.
10. In “ready to install” window, select Install to begin the installation, it would install Internet Information Services (IIS) role.
11. Click on finish, once the installation is successful.
12. Installation of “Web Interface” is completed successfully, next step is to configure Web Interface Server. Open “Citrix XenApp Server Role manger” and select configure.
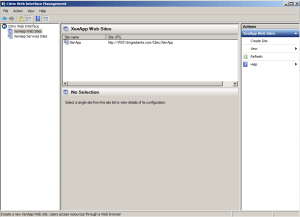
13. Citrix web interface management window would be open. We can see two options i.e. XenApp web site and XenApp service site. We’ll talk about XenApp service site in later articles. Select XenApp Web site.
14. Select “create site” to create the web site that end users will browse to access virtual applications.
15. Create site wizard will be started. A new site will be created at path “/Citrix/XenApp”. Define the name of this website and check the option to make it default page for IIS site. If you don’t check this option then it would open default IIS page on browser.
16. Define the point of authentication for end users. We’ll select an option “At Web Interface”.
17. Confirm the settings for the new site, in case of any modification go back to make the changes else click on next to continue.
18. Website creation will be started.
19. Once the website is successfully created, next step is to configure the site. Select the option of “configure this site now”.
20. Type the name of Citrix Farm that we have created. We used the default name i.e. NewFarm. Click on add to add the list of Citrix XenApp Servers in your environment. As of now we only have CTX01 in our environment.
It is suggested to add all the Citrix XenApp servers that are part of your farm. XML port is defined as port number 80. Transport type can be changed to https if secure communication is required.
21. Configure the authentication method that is preferable in your environment. For this practical we’ll select “Explicit” authentication method. All other methods will be discussed in future articles.
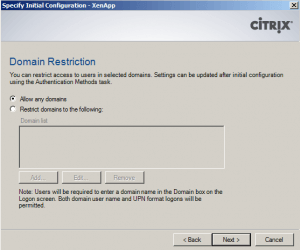
22. You can restrict the list of domains here. We only have one domain therefore we’ll select an option to “Allow any domains”. If you have multiple domains and you want end user to be restricted to few domains then you can select an option “restrict domains to the following” and add the list of all the domains that you want to allow.
23. Specify the logon screen appearance. Minimal option will not display messages and settings options to end users. Depending on your Organization’s requirement, you can define this setting.
24. Select the published resource type option.
Online: Users access applications, content and desktops hosted on remote servers via the website.
Offline: Users stream applications to their desktops and open them locally. Users must install the Citrix offline plug-in, in addition to Citrix receiver.
Dual mode: Users access both offline applications and online applications, content and desktops all on the same site. It would be preferred method as it gives access to all the applications.
25. Confirm the settings and click on next to continue.
26. Website can be seen in web interface management console. You can right click on the website and select preview or open browser and type http://WI01.itingredients.com and hit enter. It would automatically redirect to the full path.


