
How to Change IP Address using Powershell-Windows Server 2012 R2
How to Change IP Address using Powershell-Windows Server 2012 R2
As we already learned the steps to change IP address from GUI and assign IP from command prompt, in this post we’ll learn the steps to change IP address using powershell. PowerShell is very powerful tool Microsoft has embedded in their operating systems. First time PowerShell was introduced in the Windows Server 2008. PowerShell can also be used to create a scripts and automate daily activities performed by an administrator.
1. Open PowerShell to change IP Address using PowerShell in Windows. To open PowerShell click on the PowerShell icon.
![]()
2. Run the command “Get-NetIPAddress“.This will give you the detailed information about the IP configuration of your computer. As we can see that this computer doesn’t have any IP assigned moreover we don’t have any DHCP in our environment. Therefore this computer is assigned with APIPA.

3. Let’s understand some of the common terms that we’ll use while assigning IP address.
IPAddress: This represents the current IP assigned to your Computer.
InterfaceAlias: Name of your Network Adapter.
AddressFamily: This represents the IP version that we are using. We are only using IPv4 for this example therefore it shows IPV4.
PrefixLength: This represents the Subnet mask. In case of class C IP address we’ll use 24.
4. To change an IP Address using PowerShell we need to run the command “New-NetIPAddress 192.168.1.10 -interfaceAlias Ethernet0 -DefaultGateway 192.168.1.1 -AddressFamily IPV4 -PrefixLength 24” and hit enter.

5. Let’s understand the command that we used to assign IP address using PowerShell.
New-NetIPAddress: It is to assign new IP.
InterfaceAlias Ethernet0 : This command denotes the name of Network Adapter.
DefaultGateway: It is to assign default gateway to your computer.
AddressFamily: It represents the IP version that we are using.
PrefixLengh: This is the length of subnet mask. As we are using class C subnet mask therefore we are using 24.
6. In addition to IP address, we also need to assign DNS IP. To assign DNS IP Address we’ll use the command “Set-DnsClientServerAddress -InterfaceAlias Ethernet0 -ServerAddresses 192.168.1.10“.
![]()
7. Let’s understand the command we used to assign DNS IP using PowerShell.
Set-DnsClientServerAddress : This command is used to assign DNS IP.
InterfaceAlias Ethernet0 : This represents the name of Network Adapter.
ServerAddresses 192.168.1.10 : This denotes the IP of DNS.
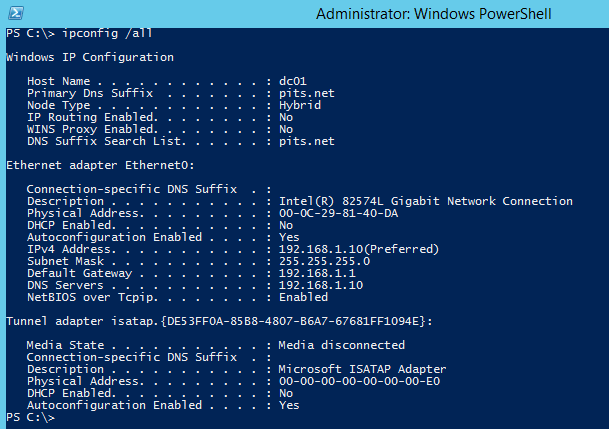
8. Type “IPCONFIG /ALL” to check TCP/IP network configuration of your computer. It shows that IP 192.168.1.10 is assigned with 255.255.255.0 as the subnet mask. Gateway is 192.168.1.10 and DNS is 192.168.1.10.

CONCLUSION:
Get-NetIPAddress: It can be used to GET the TCP/IP network configuration.
New-NetIPAddress: It can be used to assign/ change IP.
Set-DnsClientServerAddress: This command can be used to SET the new DNS IP address. You can assign more than one DNS IPs by using comma (,).
Thanks for the amazing article to set ip address using Powershell. Please clarify if we can use set-netipaddress and new-netipaddress interchangeably to change or assign new IP Address to server?